How To Spray Tan Yourself At Home (Step-by-Step Guide for Beginners)
May 18, 2026
Salon spray tans are great. The problem is they're $50 a pop before tip, which means if you're getting one every two to three weeks, you're easily looking at $1,000 to $1,500 a year just to have color on your skin.
And if you've tried foam tanners as the budget alternative? You already know the situation. Patchy knees. Weird streaks. That slightly greenish color that develops in the creases. Foam tanners are genuinely difficult to apply evenly, and even when you do everything right, the result often looks more costume than bronzed.
An HVLP spray tan machine solves both problems. You get the smooth, even coverage of a professional spray tan, at a fraction of the cost, on your own schedule. The cheapest machine I recommend is $120 on Amazon, and the solution I use costs $66 and lasts me six months when I'm spraying every single week. The math is absurdly in your favor.
This guide is going to walk you through everything: what you actually need, how to prep your skin, how to apply the tan, and the mistakes that quietly ruin most at-home results before they even develop. I've been airbrush spray tanning myself from home for 10 years, so whether this is your first time or you've been getting results that aren't quite where you want them, this covers everything you need to know.
Why More People Are Spray Tanning at Home
Tanning beds have largely fallen out of favor, and for good reason. UV damage accumulates over time in ways that show up decades later. Excessive sun exposure carries the same risks. Spray tanning gives you color without either of those tradeoffs.
But the real shift is economic. Once you've invested in a machine, each session costs only a few dollars in solution. That first $120 investment pays for itself after two or three uses compared to salon pricing.
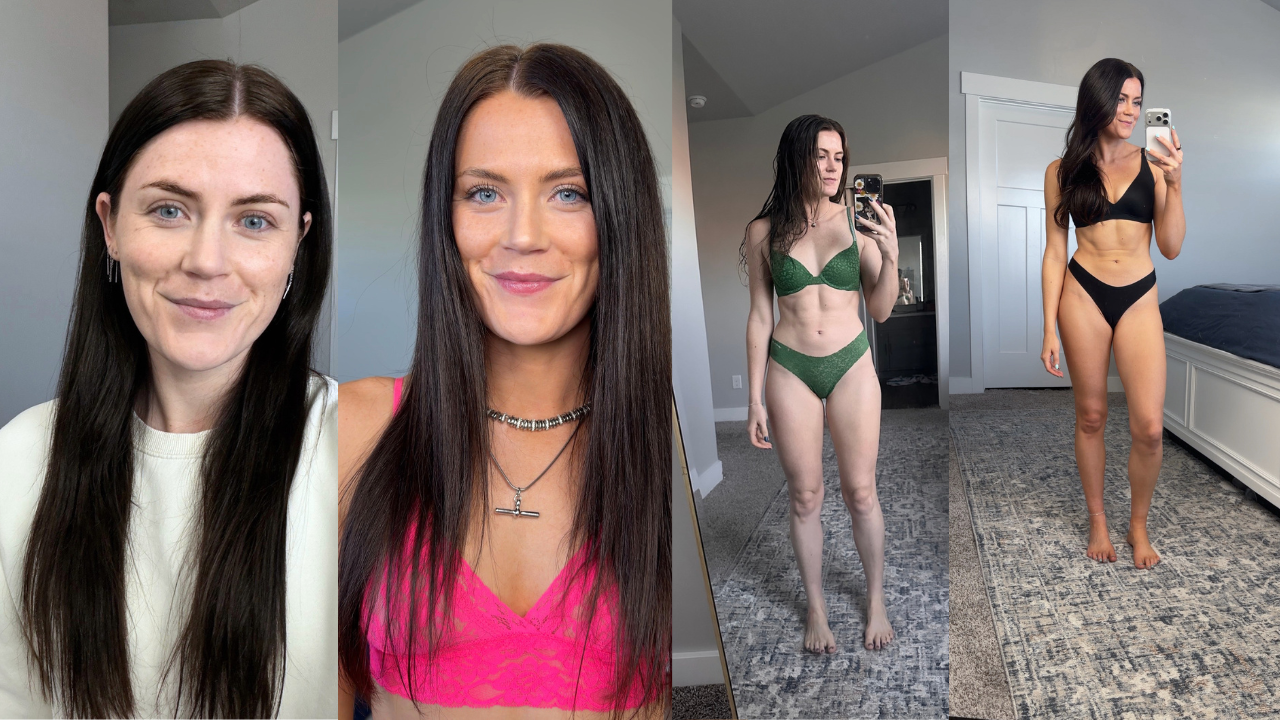
Beyond the cost, there's the control factor. You choose the shade. You choose the undertone. You do it when it fits your schedule, not when the salon has an opening. And once you've got the technique down, the results are genuinely indistinguishable from a professional tan.
What You Need To Spray Tan Yourself at Home
The Machine
This is the most important purchase, and the thing that separates good at-home results from the streaky foam-tanner situation.
What you want is an HVLP (High Volume Low Pressure) machine with a spray gun and an adjustable control valve. The control valve is essential. It lets you dial back how much solution comes out, which is what allows you to achieve a fine mist instead of a wet stream. Most bad at-home spray tans come down to too much solution applied too heavily. A machine with flow control is how you prevent that.
I've used three machines personally and recommend all of them depending on your budget and preferences:
Budget option ($120): This is the machine I used for about six and a half years of doing my own spray tans. It consistently produced beautiful results and is an excellent starting point. The air it pushes through gets warm during use, which makes application noticeably more comfortable. Shop on Amazon
Upgrade option ($379): This was actually the first machine I ever used. My mom and sister both still use theirs and it's lasted ten years with zero issues. It's a great mid-range option that often comes with sample solutions included. Shop on Amazon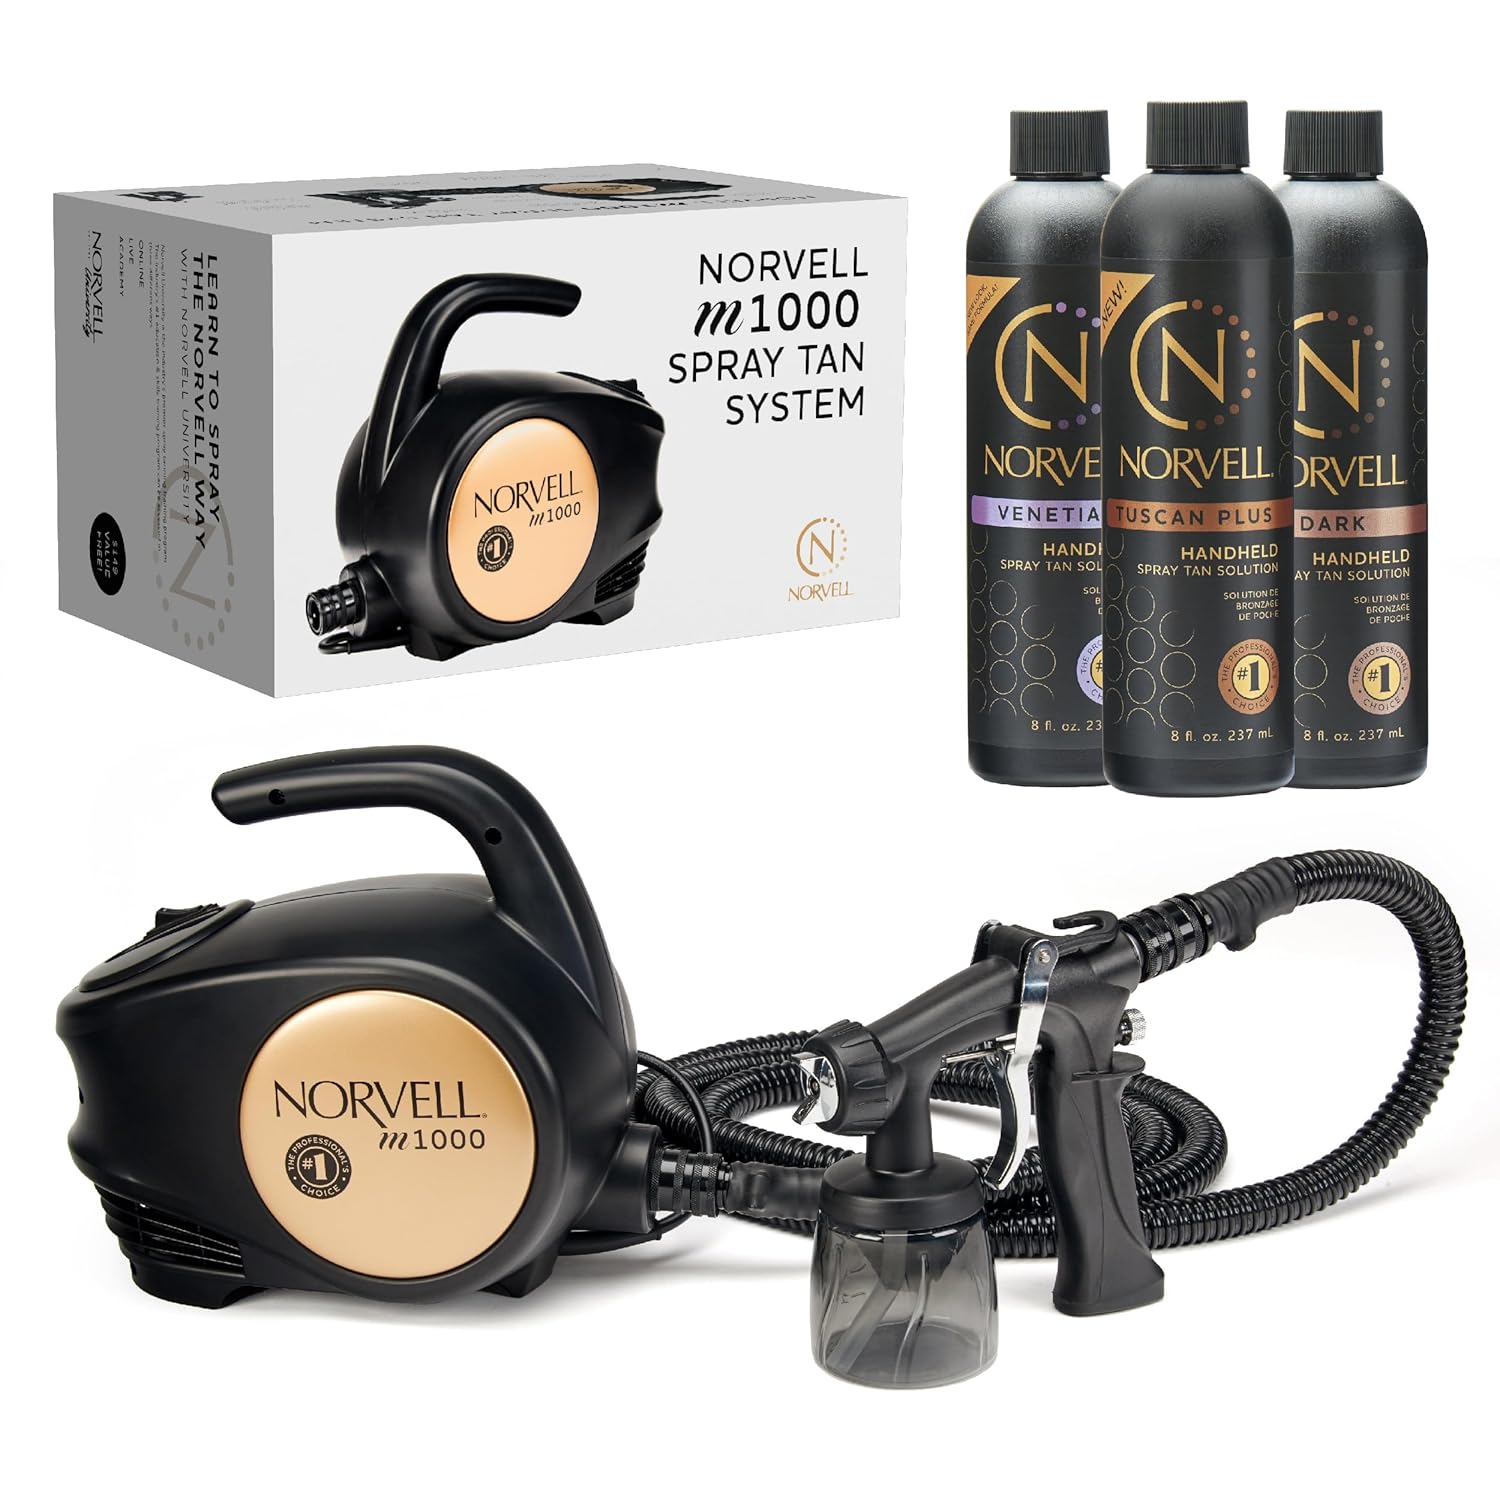
Luxury option ($479): This is what I currently use. It has a built-in holder for the spray gun so it doesn't tip over, plus a longer hose and cord that make it easier to move around during application. These are convenience features, not necessity features, but they do make the process feel more polished. Shop on Amazon
All three will give you professional-quality results. Your technique matters far more than which machine you choose.
The Solution
The machine delivers the tan. The solution determines how it looks. And choosing the wrong solution is the most common reason people end up with an orange result.
There are two things to decide:
DHA percentage: DHA is the ingredient that reacts with your skin to create color. An 8-10% DHA is a solid starting point for most people. Higher percentages develop darker but leave less margin for error.
Undertone: Solutions come in warm, cool, and neutral undertones.
Cool undertones (often violet-based) are a better match for fair to medium skin with pink, red, or blue undertones in their complexion. If your veins look blue or purple rather than green, silver jewelry tends to look more natural on you, and bright white clothing flatters you more than cream, you likely have cool undertones.
Warm undertones suit people with golden, olive, or peachy skin tones. If your veins look green, gold jewelry looks more natural, and you tan easily in the sun, you likely have warm undertones.
Neutral undertones fall in the middle and can work well with either.
The orange-spray-tan stereotype exists almost entirely because people use warm-undertone solutions when their skin has cool undertones. The mismatch is what reads as artificial.
My personal recommendation:
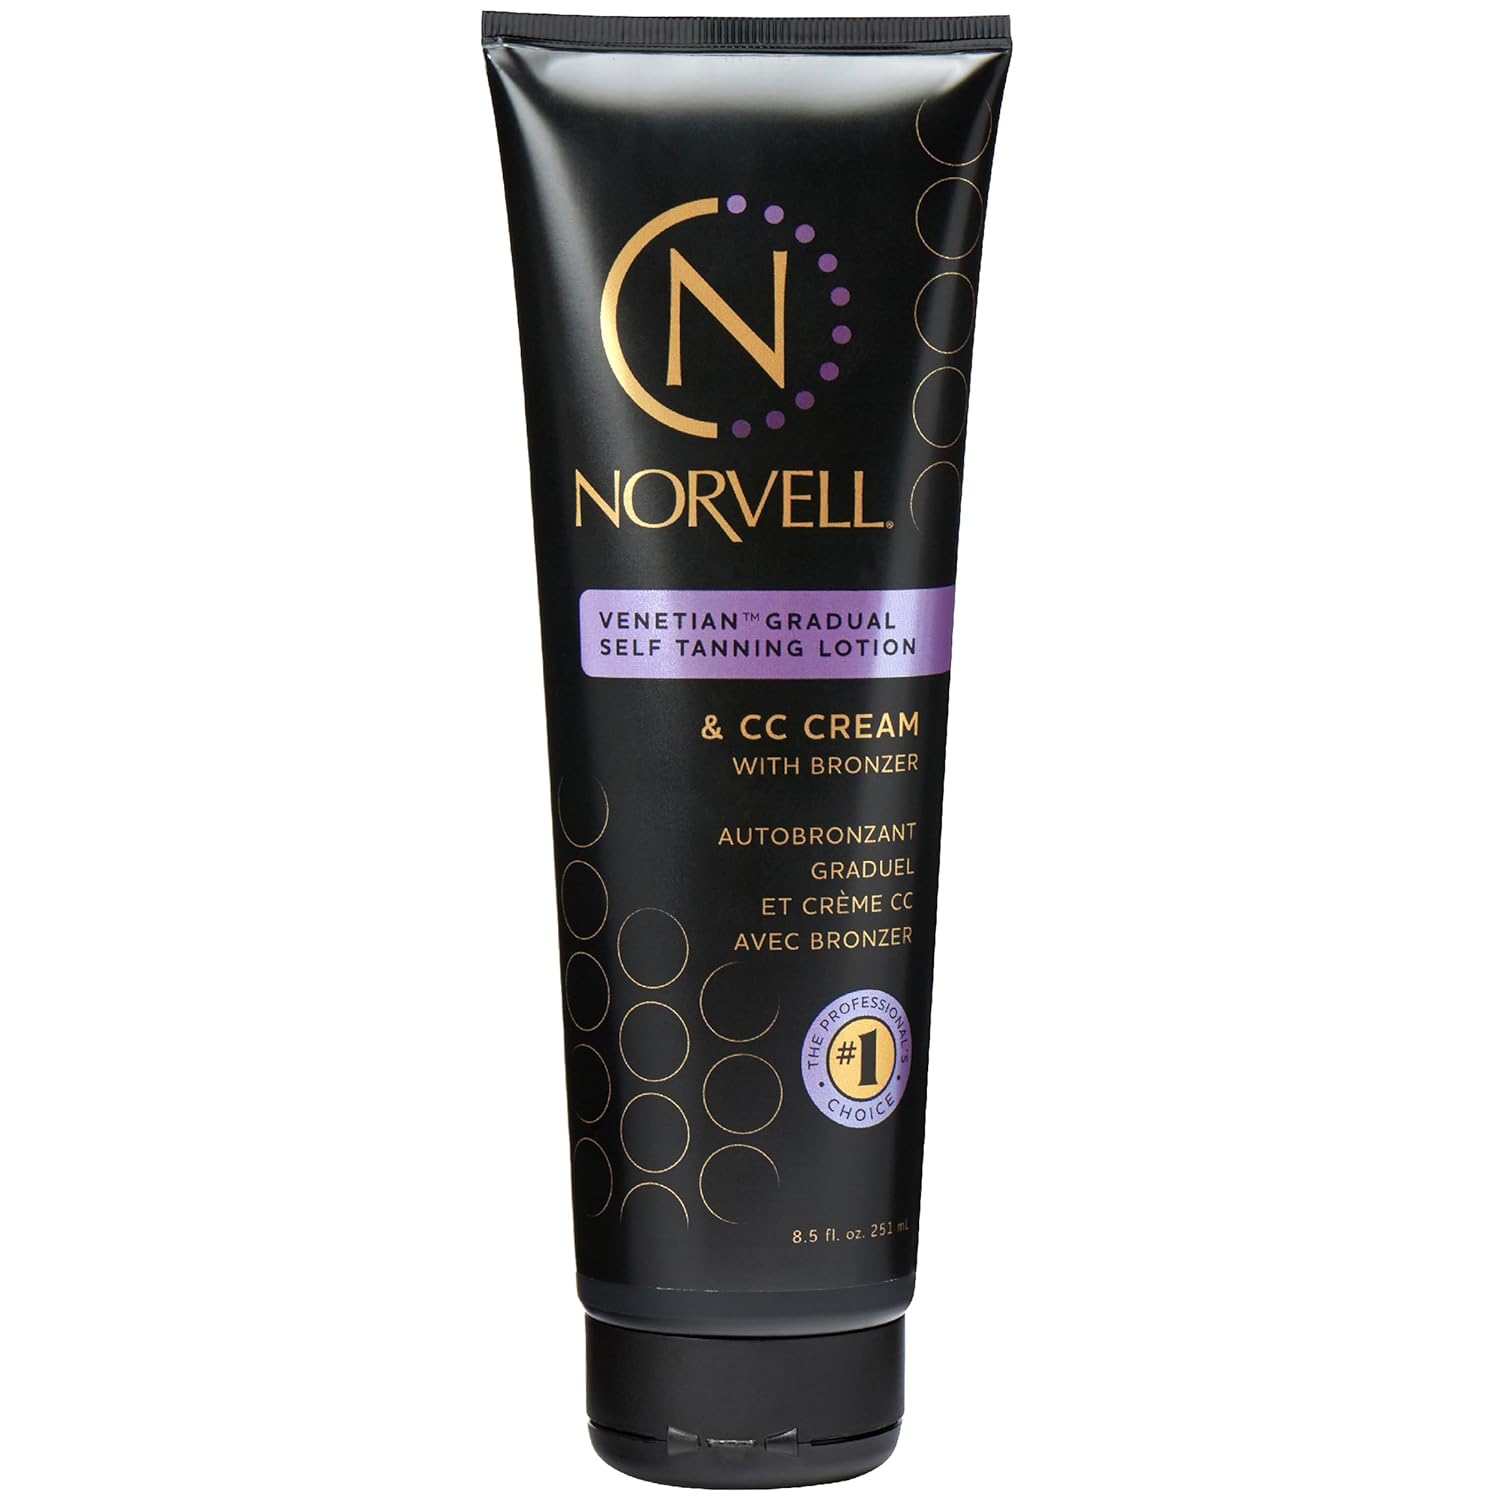
For cool-toned skin: Norvell Venetian ($31-$66)
For warm-toned skin: Norvell Dark or Norvell Double Dark ($31-$66)
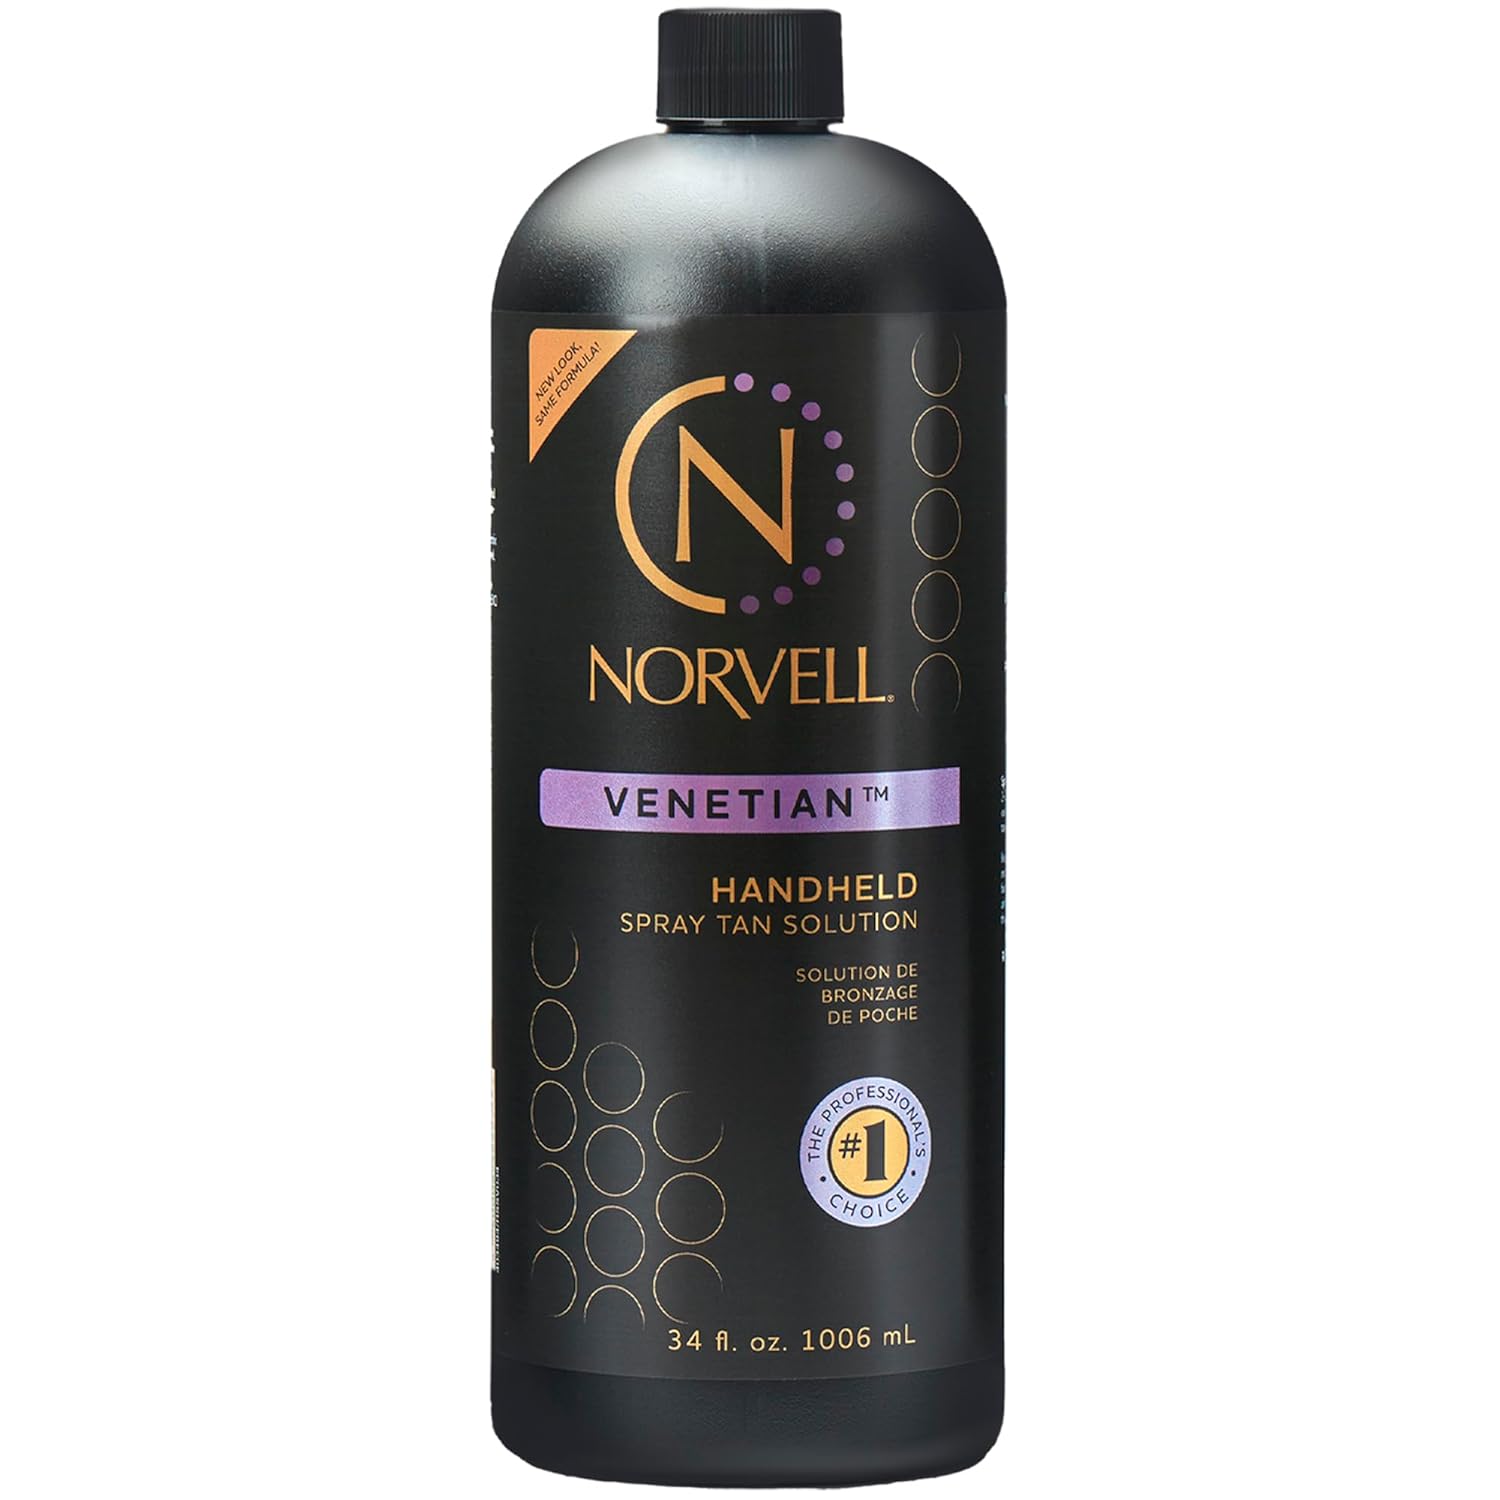
If you're not sure where you fall, I highly recommend starting with Norvell Venetian. The purple base prevents it from turning orange so it's a little bit of a safer bet for anyone's first try. I also recommend ordering sample sizes (also available on Amazon, choose the 8 oz. size in the links above) before committing to a full bottle.
Standard vs. rapid development: Most solutions develop over about 8 hours. Rapid solutions allow you to control depth based on when you rinse: roughly 1-2 hours for light, 2-3 hours for medium, 4-5 hours for darker. Standard solutions are much easier to manage for beginners since the timing is fixed, so I recommend skipping the rapid solutions when you're getting started.
Additional Supplies
You don't need all of these to start, but they make the process easier:
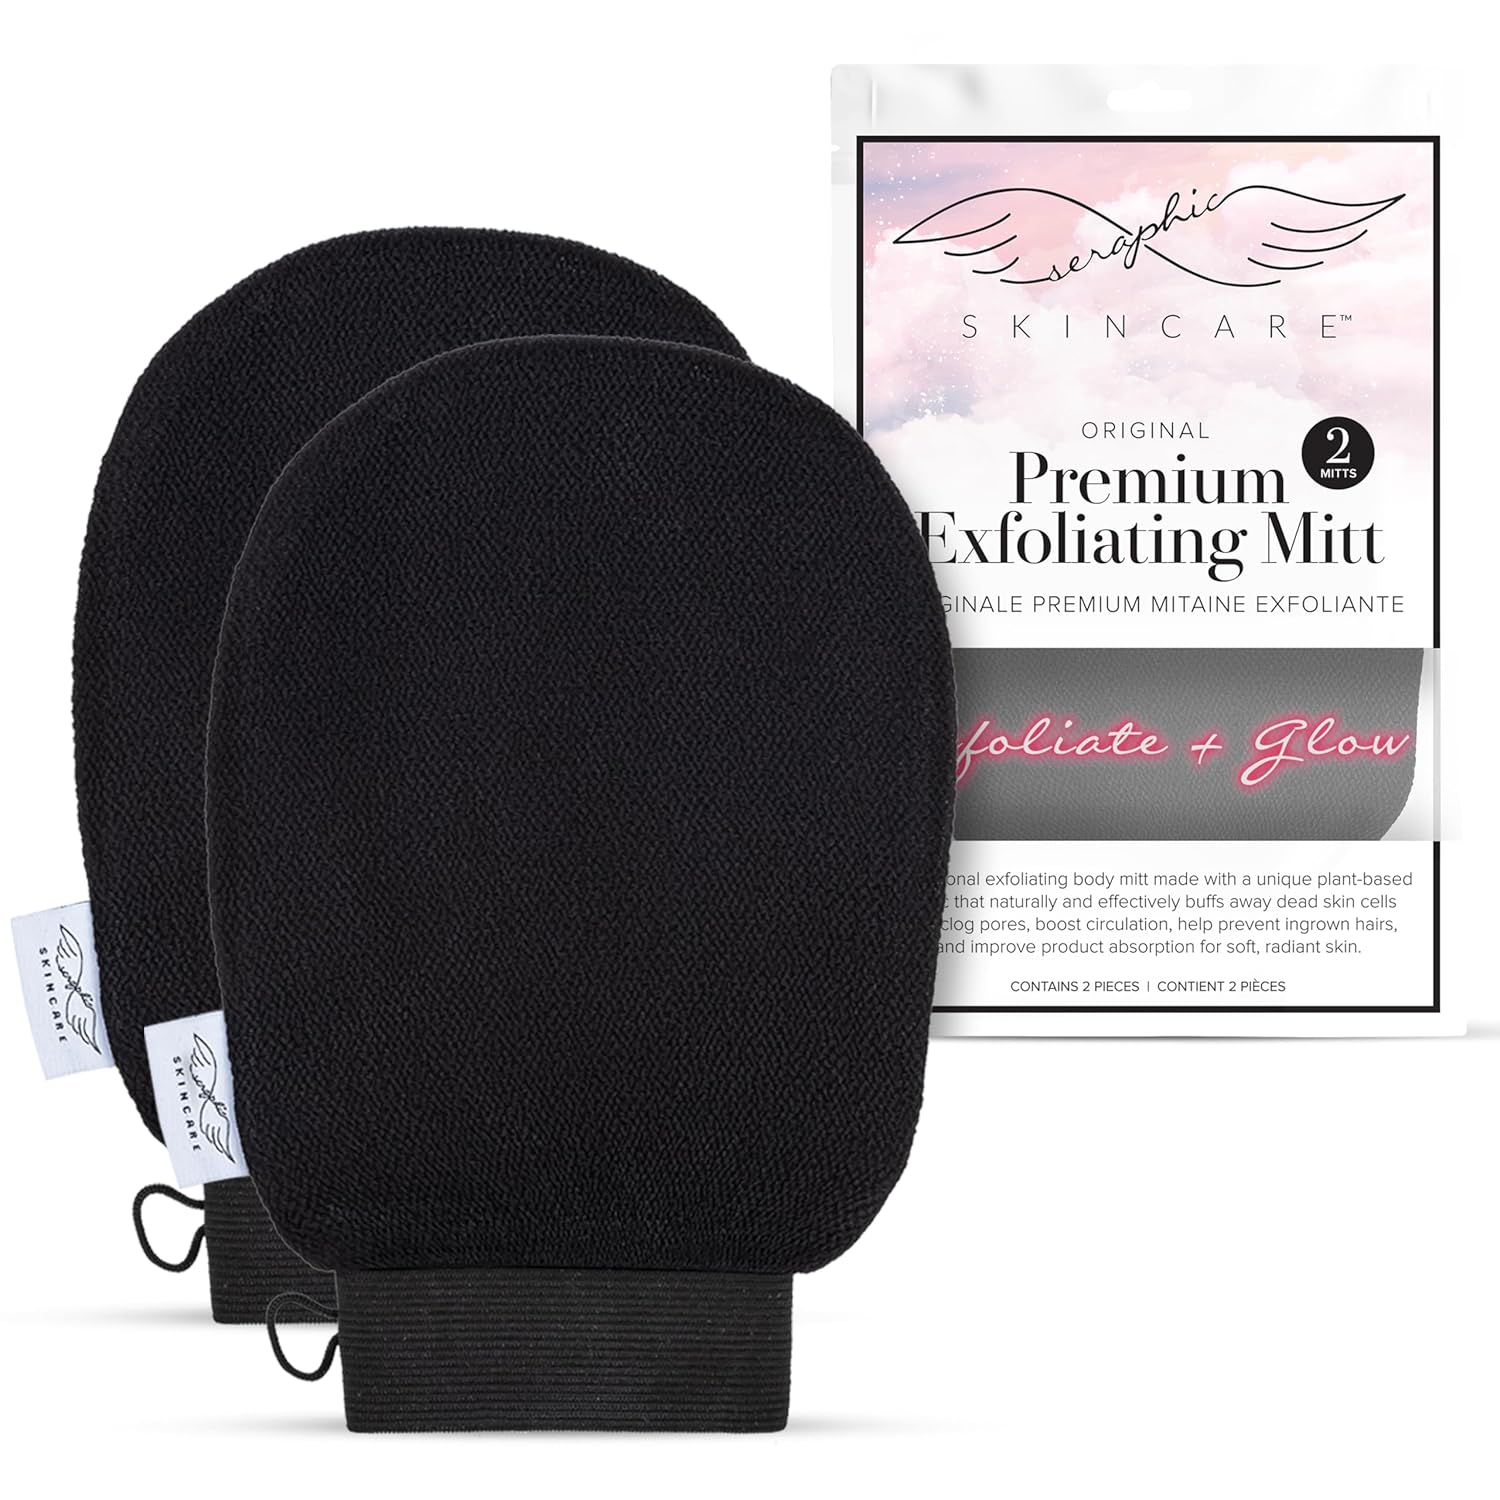
Exfoliation glove/mitt: This is genuinely worth having. It removes dead skin cells more effectively than most scrubs and doesn't leave oil residue behind that could interfere with solution adhesion. Link
Black towels: Place one on the floor of your shower while you spray to keep the soles of your feet clean. Use a second one to pat dry after your first rinse. Black towels make any bronzer transfer invisible. Link
Black, loose lounge set: You'll need to wear loose clothing during development (about 8 hours for standard solutions). Tight clothing rubbing against developing tan leaves marks. A loose, dark sleep set is ideal. Link
Black stretchy headbands: These cover your ears during application so solution doesn't get inside them. It also means you don't have to remove earrings. Simple but effective. Link
Palmer's Cocoa Butter Lotion: Daily moisturizer that extends your tan without stripping it. Link
Norvell Tan Extender Lotion: Apply around day 4-5 when your color starts to soften. Adds a little color back while keeping skin hydrated. Link
Method Foam Body Wash: A gentle body wash that won't strip your tan the way harsher or heavily fragranced products (including Dove) tend to. Link
Dark sheets: Bamboo works particularly well because it's soft and breathable, which helps if you run warm overnight during development. Link
Masks: A fine mist is going into the air while you spray. Wearing a mask until it's time to tan your face prevents you from inhaling too many solution particles. Link
How To Prep Your Skin (This Part Actually Matters)
Most uneven, patchy spray tans trace back to preparation, not application. Properly prepped skin gives the solution a smooth, even surface to develop on. Skipping prep means the solution catches on rough, dry, or product-coated areas and develops inconsistently.
24 Hours Before Your Tan
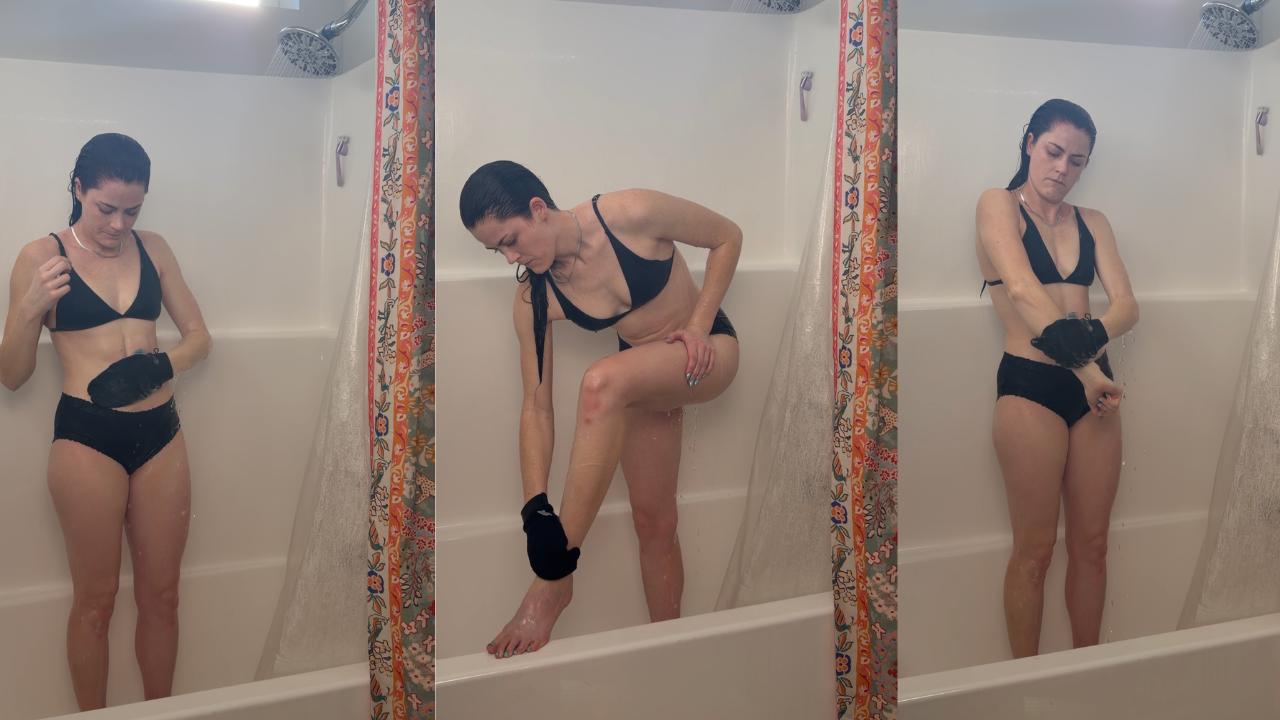
Exfoliate. Use an exfoliation glove or mitt over your entire body, with extra attention to areas that hold onto dry skin: knees, elbows, ankles, heels, and the tops of your feet. These spots are naturally porous and will absorb solution more heavily if they're not smoothed first.
Don't over-exfoliate. Once through with the mitt is enough. Aggressive scrubbing can irritate skin and create uneven absorption areas.
Shave or wax. Fresh shaving opens pores and can cause solution to settle into them, creating a stippled effect. Doing it 24 hours before lets your skin calm down and pores normalize so the solution applies smoothly.
Moisturize. Well-hydrated skin holds color more consistently. Dry areas absorb solution in an uneven, uncontrolled way. Moisturize the day before, then make sure everything is rinsed off before you apply your tan.
Day of Your Tan
Shower and remove everything. Lotion, deodorant, perfume, makeup, body oil, any skincare product. All of it. These leave barriers and residue that interfere with how solution adheres to your skin. Note: wearing deodorant during a spray tan can actually cause the solution to turn green on contact.
Remove jewelry. Rings, bracelets, necklaces, and watches can block solution from reaching the skin underneath. Remove them before your tan and wait until after your first rinse to put them back on. The exception is earrings if you're wearing a headband over your ears.
Tie your hair back completely. Loose hair brushing against wet solution creates streaks.
Apply barrier cream to dry areas. A very thin layer of petroleum jelly or unscented lotion on your knuckles, nails, palms, elbows, knees, between your toes, and the backs of your ankles. These areas absorb more than everywhere else. The barrier slows that absorption down and prevents dark patches.
Give your skin 15-20 minutes to settle after your shower. You want your skin temperature and moisture levels to normalize before you start spraying. Skin that's still warm and open from a hot shower absorbs differently than skin that's had time to settle.
Setting Up Your Space and Machine
The Best Place To Spray
The shower is the ideal location for at-home spray tanning. Overspray lands on surfaces that are already designed to get wet and be cleaned. Most bathrooms have ventilation fans that pull particles out of the air. And cleanup is simple: warm water wipes most of it away.
Put a black towel on the shower floor before you start so you're not standing directly in any solution pooling on the floor.
If you're not using your bathroom, a spray tan tent and overspray fan are worth having to protect other surfaces.
A full-length mirror in the space is helpful when you're first learning. It lets you check for missed spots in real time.
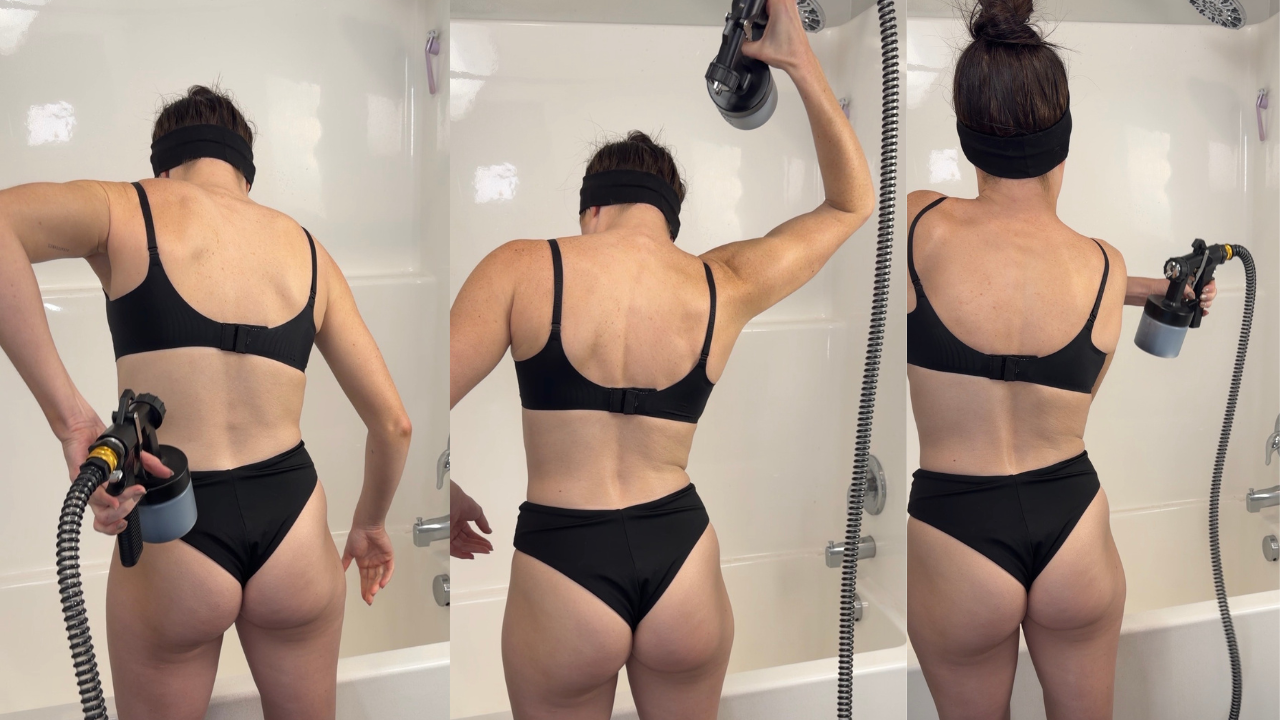
Setting Up the Machine
- Connect the hose to the machine and the other end to the spray gun.
- Pour your solution into the cup and screw it on securely.
- Rotate the spray nozzle so the opening is vertical. This sounds backwards, but a vertical nozzle actually sprays in a horizontal pattern, which makes it much easier to cover the body evenly.
- Find the control valve (usually located just under where the hose connects to the gun). Start with it tightened all the way, then loosen it in very small increments.
Do a test spray before you start. Hold the gun 6 inches from the shower wall or a paper towel and pull the trigger. What you see should look like a fine, soft mist. If it looks wet, saturated, or like a stream, tighten the control valve and test again. A lighter flow gives you far more control and far more even results.
How To Actually Apply the Spray Tan
This is the part where what you've read can only take you so far. Technique is something that genuinely clicks more quickly when you can see it. Watching the spray pattern, observing what "too wet" actually looks like, understanding body positioning in real time. But the fundamentals will get you a long way.
The Basic Technique
Hold the spray gun 6 inches from your skin. This is the sweet spot. Closer and you oversaturate the area. Farther and you lose coverage and waste solution.
Spray in long, continuous vertical passes. Start just off the body, move from your collarbone to your hip in one smooth stroke, then slightly overlap and come back up. Keep the gun moving. Stopping mid-pass creates a buildup point.
Work bottom to top: legs, torso, arms, then face and neck.
After each section, step back and look. The skin should appear like it has a soft veil of color on it, slightly dewy at most. If you can see the solution sitting on the skin, or if any area looks shiny, that's too heavy. Shiny skin means too much product. Tighten the control valve.
Starting the trigger just off the body (not while pointing directly at skin) and releasing it after you move off the body prevents small pooling spots at the start and end of each pass.
Problem Areas
Backs of the arms: The most commonly missed area. Lift one arm straight up and spray the outer and back surface in vertical passes. This exposes everything that gets hidden when your arms rest at your sides.
Inner thighs: Step into a wide lunge with the back leg extended. This opens up the inner thigh and makes it easy to reach with the spray pattern.
Back of the neck: Include a few passes down the back of the neck when you spray your upper back. It's easy to forget and will show.
Knees, elbows, ankles, hands, and feet: These areas are usually more dry and tend to develop darker than the rest of your body, so the key is to apply lighter than you think. Spray these areas from slightly further away (6-10 inches away from skin) than the rest of your skin. Go over them once and move on. They don't need a second coat. If any of these areas are extra dry, I recommend apply a very light layer of unscented lotion that you rub in really well before your tan to help prevent them from developing too dark.
Face: If you're spraying your face, tighten the control valve slightly more than for the body (less flow, not more), hold the gun about 8 inches away, and use lighter passes. The face is more sensitive and needs less product.
Back: Think of your back as three sections: the lower back, the upper middle back, and the outer shoulders.
For the lower back, spray long vertical passes from your armpit area down to where you've already sprayed your legs, slightly overlapping each pass as you move across your back.
For the upper middle back, lift your arm overhead and angle the gun downward toward your back. Spray down and outward, letting the mist fall naturally onto the skin rather than trying to paint precise lines.
For the outer shoulders and upper back, reach across the front of your body with the opposite hand and spray vertical passes over the outside of each shoulder. Repeat on the other side.
The Most Important Thing
Skin should never look wet or shiny. This is the single most useful thing to know.
The instinct when you're learning is to be thorough, to make sure you've covered everything. But heavy application is what creates streaks, orange lines, and patchy fading. A fine mist that barely dampens the skin is what produces that looks-like-a-real-tan result.
If you accidentally over-spray an area and it looks shiny, gently blot it with a piece of toilet paper. Blend around the edges so there's no harsh line, then do a very light pass over it with the gun. It may look slightly uneven right after, but it will even out during development.
When in doubt: lighter. You can always build with additional light layers. You can't undo a heavy application.
What To Avoid While Your Tan Develops
Once you've applied the tan, it needs to develop undisturbed. The DHA in the solution is reacting with your skin cells. Anything that interferes with that reaction affects the result.
Water of any kind. No showering, swimming, or even washing your hands normally until development is complete. If you need to wash your hands, I recommend using hand sanitizer and being very careful to keep it on the palm side of your hands and fingers.
Sweating. Avoid any exercise or activity that makes you sweat. Sweat moves solution across the skin and creates streaks.
Tight clothing. Waistbands, leggings, sports bras, any fabric pressing firmly against skin can displace solution and leave lines. Wear loose, flowy clothing throughout development.
Skin-to-skin contact. Areas where skin presses on skin (inner elbows, behind knees, inner thighs, under the chest) can develop unevenly. Try to rest in positions that let air circulate.
Any products. No lotion, deodorant, perfume, or skincare until after your first rinse.
The easiest way to handle all of this: apply your tan in the evening, put on your loose sleep set, and let it develop overnight while you sleep.
How Long To Leave It On
For standard solutions, the typical development window is 8 hours.
Always check the instructions on your specific solution for the recommended range.
The First Rinse
Your first rinse removes the cosmetic bronzer (the guide color) and any remaining surface solution. This is the rinse that confuses almost every beginner.
When you step into the shower, you'll see brown water running off your skin. That's normal. That's the bronzer washing away, not your actual tan.
Use lukewarm water (not hot), no washcloths or loofahs, and no vigorous scrubbing. Hands only. Pat dry when you're done. Do not rub.
The real DHA-developed color may look lighter right after this rinse than you expected. That's also normal. The tan continues developing slightly throughout the day. Most people find the color settles into its most natural, even tone by the next morning or the day after.
For the first 24 hours after your rinse: avoid long hot showers, shaving, and exfoliation. Hot water and prolonged soaking strip color faster, especially when it's fresh.
How To Make Your Spray Tan Last Longer
Most spray tans last 5-12 days depending on your skin type, prep quality, and aftercare habits. Here's what actually makes a difference:
Moisturize every day. Dry skin sheds dead cells faster, and your tan fades with them. Daily moisturizer is the single most impactful aftercare habit. Focus on areas that dry out quickly: elbows, knees, hands, ankles, feet.
Use a gentle body wash. Harsh soaps and heavily fragranced products strip the outer skin layer and accelerate fading. Method Foam Body Wash is a great option.
Keep showers short and lukewarm. Long hot showers dry out skin and fade color faster.
Avoid exfoliation until you're ready to reapply. This includes exfoliating gloves, loofahs, and body brushes. The exception: if a specific area is fading patchily and looking uneven, lightly exfoliating just that spot helps it fade more gradually and less obviously. Common spots: collarbone, armpits, knees, ankles.
Avoid oil-based products. Body oils and oil-based cleansers break down the tan more quickly.
Use a tan extender. Around day 4-5, when the color starts to soften, a tan extender lotion like this Norvell one adds a little color back and helps the fade look gradual rather than patchy.
Limit shaving. Shaving naturally exfoliates the skin. If you need to shave, use a fresh razor and light pressure.
Planning a Spray Tan for an Event
Spray tans look their absolute best on days 2-3 after application. Day 1 is when color is still settling and may be a little darker. By day 2 it's typically the most even and natural-looking.
If you're tanning for a wedding, photoshoot, vacation, or another important occasion, plan your application for two days before the event.
More importantly: practice before the event. Experiment with your solution choice, your development time, and your technique well in advance. By the time the occasion arrives, you'll already know exactly what your results look like and how to reproduce them confidently.
And don't try new skincare products in the days leading up to it. New exfoliants, retinols, or oils can affect how solution develops in unpredictable ways. Stick with whatever routine you already know works for your skin.

A Sample Weekly Routine
One of the best things about learning to do this yourself is that you can build a routine around your actual life rather than salon availability. Here's what mine looks like as an example:
Wednesday night: Full prep shower. Exfoliate, shave, deep cleanse. I also take care of anything else that could interfere with a fresh tan, like at-home laser hair removal, teeth whitening, or touching up hair roots.
Thursday evening: Quick rinse shower to remove any lotion or product from the day at least an hour before application. Once you've been dry for at least an hour, then apply the spray tan. I do this at night so it develops while I sleep. Loose dark sleep set, dark sheets.
Friday morning: First rinse. The tan is set and I'm back to my normal routine.
Daily: Palmer's Cocoa Butter on my body, Weleda Skin Food on my face.
Around Monday: Apply Norvell Tan Extender to extend the color through the week.
Wednesday evening: The cycle starts again.
You don't need to follow this exactly. The beauty of doing it yourself is that it adapts to your schedule. Once the routine is established, a new tan every week genuinely takes less time and effort than it sounds.
Common Mistakes and How to Fix Them
Spraying too close or too heavy. If skin looks shiny or wet after a pass, you're either too close or the flow is too high. Aim for 6 inches and tighten the control valve. The solution should look like a soft veil, not a coating.
Wearing tight clothing during development. Waistband lines and fabric impressions in the developing tan are almost impossible to fix. Put on loose clothing before the tan is even dry.
Panicking after the first rinse. The bronzer washing off and revealing a lighter color underneath is normal. The DHA color is still there and still developing. Wait 24 hours before judging the final result.
Choosing the wrong undertone. If your tan consistently looks orange no matter what you do, the solution undertone is almost certainly the issue. For fair to medium skin with cool or pink undertones, use a violet-based or cool-toned solution. Save warm-toned solutions for people with olive or golden complexions.
Stopping the spray on your skin. Start the trigger just before you reach the skin, and release it just after you move off. This prevents small blobs where the spray starts and stops.
Missing the back of the neck and inner thighs. They're easy to forget. The back of the neck shows when your hair is up. The inner thighs are visible constantly. Lunge for the inner legs, and always include the neck in your upper-back passes.
Is Learning To Spray Tan Yourself Worth It?
For most people who commit to learning the process: yes, clearly.
The ongoing cost is a fraction of salon pricing. Once the technique is dialed in, the results are consistent and genuinely professional-quality. You're not dependent on anyone's schedule. You can touch up when you want to, match your color to how deep you want it on a given week, and not think twice about the cost.
The honest caveat is that there's a learning curve. Your first two or three applications will probably not be perfect. But the technique improves quickly with repetition, especially once you understand what you're actually trying to achieve with each step.
Reading about technique builds a real foundation. But this is one of those things that clicks fastest when you can see it in action: what the spray pattern actually looks like, how wet "too wet" looks in real time, where to position your body. That gap between reading and watching is the fastest way through the learning curve.
Take It Further: The At-Home Spray Tan Course
If you want to compress that learning curve and skip the guesswork, I put together a full video course that covers everything here in much more depth.
Inside you'll find:
- How to apply a spray tan to your own back for natural, even coverage
- Undertone identification with real visual examples
- Machine setup and calibration walkthrough with every adjustment explained
- Full live application demo so you can see the spray pattern, the distance, the technique in real time
- How to handle the face, hands, and feet specifically
- Troubleshooting for every common problem: patchiness, streaking, dark knees, uneven fading
- A complete weekly maintenance routine
- Touch-up strategies and how to use a tan extender for gradual fading
The information here will genuinely help you improve. The course is for people who want consistent, professional results from the beginning, without spending sessions figuring out what went wrong.
Frequently Asked Questions
How do I spray tan myself at home without it looking orange?
Orange results are almost always a solution undertone problem. If you have fair to medium skin with cool or pink undertones, use a cool or violet-based solution like Norvell Venetian. Warm-toned solutions pull orange on cooler complexions. Proper prep (exfoliation, no oil or lotion residue on skin) also ensures the solution absorbs evenly rather than pooling in dry spots.
What's the best at-home spray tan machine for beginners?
An HVLP machine with an adjustable control valve. The valve is what lets you dial down the flow to a fine mist. My budget recommendation is $120 on Amazon and works beautifully. The upgrade option at $379 is also excellent and has a proven track record of lasting many years.
How long does a spray tan last when done at home?
With proper prep and aftercare, 5-12 days. Daily moisturizing, gentle body wash, lukewarm showers, and avoiding exfoliation are the main factors. Using a tan extender around day 4-5 can extend that meaningfully.
Can a complete beginner do this at home?
Yes, but expect a learning curve. Your first one or two applications may not be perfect and that's fine. Focus on light application, good prep, and understanding the technique, and you'll improve quickly.
Why does my spray tan look lighter after I rinse off?
What rinses off in that first shower is the cosmetic bronzer in the solution, not your actual tan. The real DHA-developed color is still there and will continue deepening for several hours after the rinse. The final result won't be fully visible until 24 hours later.
How close should I hold the spray gun?
6 inches for most of the body, 8-10 inches for hands, feet, and face. Too close oversaturates the area. Too far and you waste solution and lose coverage.
Can you spray tan yourself without streaks?
Yes, with the right technique. Streaking comes from applying too heavily (solution runs before it dries), not exfoliating beforehand (solution catches on rough patches), or wearing tight clothing during development. A fine mist on properly prepped skin with loose clothing after will give you a smooth, even result.
What's the difference between a spray tan machine and a foam tanner?
A machine atomizes the solution into a fine mist you can control, applying it evenly in thin layers with consistent coverage. Foam tanners are applied by hand with a mitt, which makes it much harder to get consistent coverage across the body. You can't control how much product goes on any given area the way you can with a spray gun, which is why foam tanners tend to produce streaky or patchy results even with good technique.